
| Properties | ||
| Bevel | Determines the amount of smooth beveling added around the edges of the opaque parts of the layer. Range: 0 to 2; Default: 0.1 |
|
| Refraction | The amount of refraction applied where there are changes in the height map or bevel curvature. This is a maximum refraction distance in pixels. Range: -100 to 100; Default: 5 |
|
| Chromatic Aberration | The amount of chromatic aberration applied where there are changes in the height map or bevel curvature. This is similar to the Refraction setting but only operates on pixel hues. Range: -100 to 100; Default: 5 |
|
| Feature Size | The overall amount that surface features (changes in the height map or bevel curvature) affect refraction and chromatic aberration (if this is reduced to zero, Refraction and Chromatic Aberration are ignored) Range: 5 to 500; Default: 100 |
|
| Smoothing Samples | The number of height map samples that are used to calculate the surface normals used for chromatic aberration and refraction. If this is too low, banding can occur because the change from one pixel to the next causes aliasing in the surface normals. As this increases, more nearby pixels are averaged to compute the surface normal, so less aliasing happens, but details in the surface will also become more smoothed out. Range: 1 to 20; Default: 2 |
|
| Color | A tint color that is combined with whatever is behind the layer, based on the setting of the Blend parameter. This color is combined using Multiply blending so it simulates the look of colored glass. Default: |
|
| Blend | The amount of Color applied to tint the glass. Range: 0% to 100%; Default: 0% |
|
| Light Source | ||
| Shading | Controls how the surface of the shape defined by the bevel, roughness, and height map is shaded.
|
|
| Intensity | The brightness of the light source, used when Shading is set to Point Light or Directonal Light. Range: 0% to 200%; Default: 100% |
|
| Shine | Controls how shiny the surface is. Higher values make the surface appear more metallic. Range: 0 to 1; Default: 0.8 |
|
| Specularity | The amount of specular reflectivity in the shape's surface material. Use lower values for a matte finish, and higher values for smooth, glossy surfaces. Range: 1 to 250; Default: 30 |
|
| Ambient | The amount of ambient light in the environment. Ambient light is light that comes from all around, without a particular direction, and is useful for shapes in scenes with lots of soft, scattered light. Lower values result in less ambient light, for a harsher lighting effect and more pronounced shadows. Higher values result in less pronounced, weaker shadows. Range: 0 to 1; Default: 0.1 |
|
| Color | The color of the light source. Default: |
|
| Direction | The direction of the light source, used when Shading is set to Point Light or Directional Light. Default: 75, -75 |
|
| Elevation | The distance of the light source from the shape (not from the screen). Positive values place the light source in front of the shape; negative values place the light source behind the shape. This is only used when Shading is set to Point Light or Directonal Light. Range: -100 to 800; Default: 100 |
|
| Roughness | ||
| Use Layer Luminance | When turned on, the luminance of pixels in the layer is used as a height map, affecting lighting, chromatic aberration, and refraction. Default: on |
|
| Amount | The amount of randomly generated roughness to apply to the height map (in addition to any roughness from the layer luminance or curvature from the bevel). Range: -100% to 100%; Default: 0% |
|
| Scale | Scales the randomly generated roughness. Range: 0.01 to 50; Default: 1 |
|
| Evolution | Controls small, gradual changes in the random pattern of roughness in the layer surface when Amount is greater than zero. Animate this to produce flowing motion. Range: -50 to 50; Default: 0 |
|
| Seed | A value used to generate the pattern of random roughness in the layer surface when Amount is greater than zero. Change this for a different pattern of roughness. Use keyframe animation to make the roughness change radically every frame. Range: 0 to 5; Default: 0 |
|
Usage
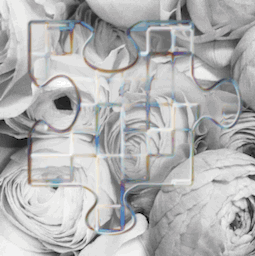
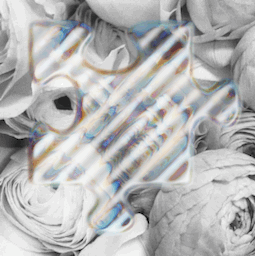
Apply this effect to a layer to render the layer as though it were made of glass. The layer becomes see-through, revealing whatever is behind the layer (so this is best used in front of images, video, or other complex textures or backgrounds).
The easiest way to use this effect is to apply it to a shape layer, turn off Use Layer Luminance, and just adjust the Bevel and roughness Amount and Scale as desired. In this case, the colors in the layer don't matter, and only the outline of the opaque region of the layer is used (you can also use the Chroma Key or Luma Key effects first to extract an outline from a solid color shape in a photo, then apply this effect).
Another approach is to create a height map within a rectangular layer, where white pixels are considered higher and black pixels are considered lower. In this case, it is most common to turn on Use Layer Luminance and set the Bevel amount to zero.
Regardless of which approach you use, after applying the effect, it's usually easiest to first adjust the lighting, then change the settings for Chromatic Aberration and Refraction.
How it Works
Omino Glass works by building a height map from the layer, then using the height map to calculate surface normals, and then using the surface normals to render the refraction, chromatic aberration, and lighting.
The height map is built from several sources. The initial height map comes from the brightness of pixels in the layer (brighter pixels are higher and darker pixels are lower) although this can be disabled by turning off Use Layer Luminance. A bevel is then added to the height map along the edge of the opaque region of the layer, based on the Bevel parameter. Finally, the height map is roughened randomly based on roughness parameters such as Amount, Scale, and so on.
After the height map is constructed, the surface normal (basically, the 3D orientation of the surface of the layer) is calculated for each pixel based on the change in the height map between each pixel and its neighbors (the number of neighboring pixels sampled to calculate each pixel's surface normal depends on the setting of the Smoothing Samples parameter).
Once the surface normals have been calculated, the layer is rendered by separating the canvas behind the layer into seven chromatic channels, sampling those channels based on offsets calculated from the surface normals and the Refraction, Chromatic Aberration, and Feature Size parameters, and then merging the sampled colors back together and blending them with any lighting that has been applied to the layer.
Use Cases
- Stained glass: Set the Color parameter to the glass color and then increase the Blend parameter.
- Handmade glass: Increase the Refraction and Amount parameters.
- Molten glass: In the Roughness section, increase the Amount parameter and animate the Evolution parameter.
- Textured glass: Apply a procedural effect such as Fractal Ridges, Turbulence, Block Noise (with the Freeze parameter enabled), or Stripes, then add Gaussian Blur with a low strength, and finally add Omino Glass+ with the Use Layer Luminance option enabled.
See Also
- Glass
- Displacement Map