
| Properties | ||
| Orientation | The orientation of the 3D object. This is similar to Rotation, but is interpreted differently when animated using Keyframes. /Orientation animates along the nearest path between different poses, and is useful for posing an object or animating an object between poses. Orientation values can't go out of range, so you can't use Orientation to "spin" an object (for that, use Orientation without animation to pose the object, and animate Rotation to create the spin) Default: 0.000000,-0.000000,0.000000 |
|
| Rotation | The rotation of the 3D object. This is similar to Orientation, but the X, Y and Z components are interpreted independently when animated and can go out of range. This makes Rotation very handy for animating spinning motion, but not as convenient for creating arbitrary poses or animation between specific positions (for that, use Orientation). Default: 0, 0, 0 |
|
| Width | The width of the object (the size along the x-axis) in proportional layer coordinates. Range: 1% to 1000%; Default: 100% |
|
| Height | The height of the object (the size along the y-axis) in proportional layer coordinates. Range: 1% to 1000%; Default: 100% |
|
| Depth | The depth of the object (the size along the z-axis, away from the viewer, into the screen) in proportional layer coordinates. Range: 1 to 1000; Default: 10 |
|
| Position | The position of the shape in 3D space in proportional layer coordinates. Default: 0, 100, 500 |
|
| Scale | A scaling factor to apply to the 3D shape after it has been projected onto the 2D layer. This makes the shape larger or smaller without affecting the perspective in 3D space. Range: 0 to 10; Default: 1 |
|
| Interior | ||
| Interior Color | The color to use for the interior of the object, revealed by extrusion. Note that for the to be effective, you also must adjust Interior. Default: |
|
| Interior | Controls how much of the interior color is used for the extruded part of the 3D object. When this is 0% the interior color is not used, and the color of the pixels near the edges of the original layer are used. When this is 100%, the edge pixels are ignored and only Interior Color is applied. Range: 0% to 100%; Default: 0% |
|
| Fade Color | This is similar to Interior Color but is applied in a gradient that is stronger toward the back part of the extruded volume. Use this if you want the extruded sides of the shape to fade towards a different color in the back. Note that for this to be effective, you also must adjust Fade. Default: |
|
| Fade | Controls how much of the Fade Color is applied to the extruded volume. When this is 100%, the back part of the extruded volume fully uses the fade color. For smaller values, the fade color becomes transparent, and at 0% it is ignored. Range: 0% to 100%; Default: 0% |
|
| Light Source | ||
| Shading | Controls how the surface of the 3D shape is shaded.
|
|
| Intensity | The brightness of the light source, used when Shading is set to Point Light or Directonal Light. Range: 0% to 200%; Default: 100% |
|
| Shine | Controls how shiny the surface is. Higher values make the surface appear more metallic. Range: 0 to 1; Default: 0.8 |
|
| Specularity | The amount of specular reflectivity in the shape's surface material. Use lower values for a matte finish, and higher values for smooth, glossy surfaces. Range: 1 to 150; Default: 30 |
|
| Ambient | The amount of ambient light in the environment. Ambient light is light that comes from all around, without a particular direction, and is useful for shapes in scenes with lots of soft, scattered light. Lower values result in less ambient light, for a harsher lighting effect and more pronounced shadows. Higher values result in less pronounced, weaker shadows. Range: 0 to 1; Default: 0.1 |
|
| Color | The color of the light source. Default: |
|
| Direction | The direction of the light source, used when Shading is set to Point Light or Directional Light. Default: 75, -75 |
|
| Elevation | The distance of the light source from the shape (not from the screen). Positive values place the light source in front of the shape; negative values place the light source behind the shape. This is only used when Shading is set to Point Light or Directonal Light. Range: -100 to 800; Default: 100 |
|
| Ray Marching | ||
| Precision | Controls how precisely the 3D object is rendered by adjusting the number of iterations used when ray marching. More iterations will yield higher-quality results, especially for the edges of objects. Fewer iterations will give faster preview and export performance. For best results, a setting between 30 and 60 is recommended. Range: 10 to 800; Default: 200 |
|
Usage
To make an extrusion, you first need a layer with both opaque and transparent parts. There are several ways to get such a layer:
- Use Vector Drawing or Freehand Drawing to draw a shape.
- Use a Text Layer or Shape Layer
- Start with a photo or video and apply an effect such as Chroma Key to make parts of it transparent
Once you have prepared an appropriate layer, simply apply the Raster Extrude effect and adjust Rotation or Orientation to achieve the desired angle, then adjust Depth to adjust the extruded thickness.

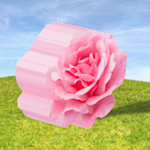
Interior
When you extrude a layer, the interior of the shape becomes visible as it is stretched out. Normally, the original pixel colors in the layer are extruded, but sometimes you want the interior to be a different color. To accomplish this, just set Interior to 100% and adjust Interior Color as you like.
For example, here the color of the shape is orange, but the interior color has been set to red.

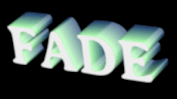
In addition, you can fade to a different interior color toward the back of the shape. To do this, set Fade to 100% and choose the color you want in Fade Color.
For example, here the Fade Color is red, and Fade is being animated between 0% and 100%.
You can combine both Interior Color and Fade Color (with Interior and Fade both set to 100%) to create a gradient along the extruded edges. For example, here the Interior Color is green, and the Fade Color is blue.
Lighting Tip
When using this effect with an image or photo, the layer colors can seem a little bit weak, dark, or faded after applying the effect because the light source is not directly in front of the extruded layer. There are two easy ways around this.
- If you want to precisely match the original layer colors and don't care about using lighting at all, in the Light Source section just set Shading to Flat.
- If you don't mind if the colors are slightly different from the original layer and want to keep the lighting effect, in the Light Source section just increase Intensity or Ambient.
Quality Tip
You may occasionally notice a slight loss of detail around the edges of an extruded layer.
Raster extrusion is really powerful because you can combine it with pixel-based effects like Chroma Key, but that power comes at a cost: Individual pixels are square, and extruding them would normally result in an ugly "staircase effect" around curves and diagonals. To avoid that, this effect smooths the edges of the layer a little, which can occasionally result in a loss of fine detail.
If that happens, you can fix it by increasing the resolution of the layer. Just put the layer in a group, then increase the width and height in the group settings until the edges of the extrusion look good.
Flat Projection
Note that although this effect produces a result that appears three-dimensional visually, the actual output is still a normal 2D layer, which interacts with other layers and effects as a normal flat layer.
Applying an effect such as Flip Layer or placing a layer containing a further object in front of a layer containing a nearer object will not behave as you might expect if the results of this effect were actually three-dimensional.